YOLOv9
一个单阶段卷积检测器:一次前向就为密集的检测框网格打分,再由 NMS 去掉重复的那些。LibreYOLO 收录了它的三个变体,其中一个没有 NMS 步骤。
- 任务
- detection
- 尺寸
- yolo9: t, s, m, c at 640 px; yolo9_p2: t, s at 640 px
- 安装
pip install libreyolo- 支持层级
- 旗舰,自 v1.0.0 起。功能在这里最先设计,并完整地在 GPU 上验证。
- 许可
- 代码采用 MIT,权重采用 MIT。商用
安装
YOLOv9 在基础包之外不需要任何 extra。
pip install libreyolo预测
权重在首次使用时从 Hugging Face 下载,并缓存在本地。
from libreyolo import LibreYOLO, SAMPLE_IMAGE model = LibreYOLO("LibreYOLO9s.pt")result = model(SAMPLE_IMAGE, save=True) for box in result.boxes: print(box.cls, box.conf, box.xyxy)libreyolo predict model=LibreYOLO9s.pt save=True \ source=https://raw.githubusercontent.com/LibreYOLO/libreyolo/release/libreyolo/assets/parkour.jpgfrom libreyolo import LibreYOLO, SAMPLE_IMAGE # 同样的调用,换一个检查点。端到端 head 返回自己得分最高的预测,# 所以不跑 NMS,iou 也被忽略model = LibreYOLO("LibreYOLO9E2Es.pt")result = model(SAMPLE_IMAGE, conf=0.25, max_det=300) print(len(result.boxes))返回的 Results 对象就是每个家族都会返回的那一个,所以换成另一个检测器只是改一行
的事。在基础模型和 stride-4 模型上,conf 设置置信度阈值,iou 设置 NMS 阈值。端
到端模型不跑 NMS,也忽略 iou,所以决定它输出形态的是 conf 和 max_det。数据
源、流式处理和结果处理见预测。
变体
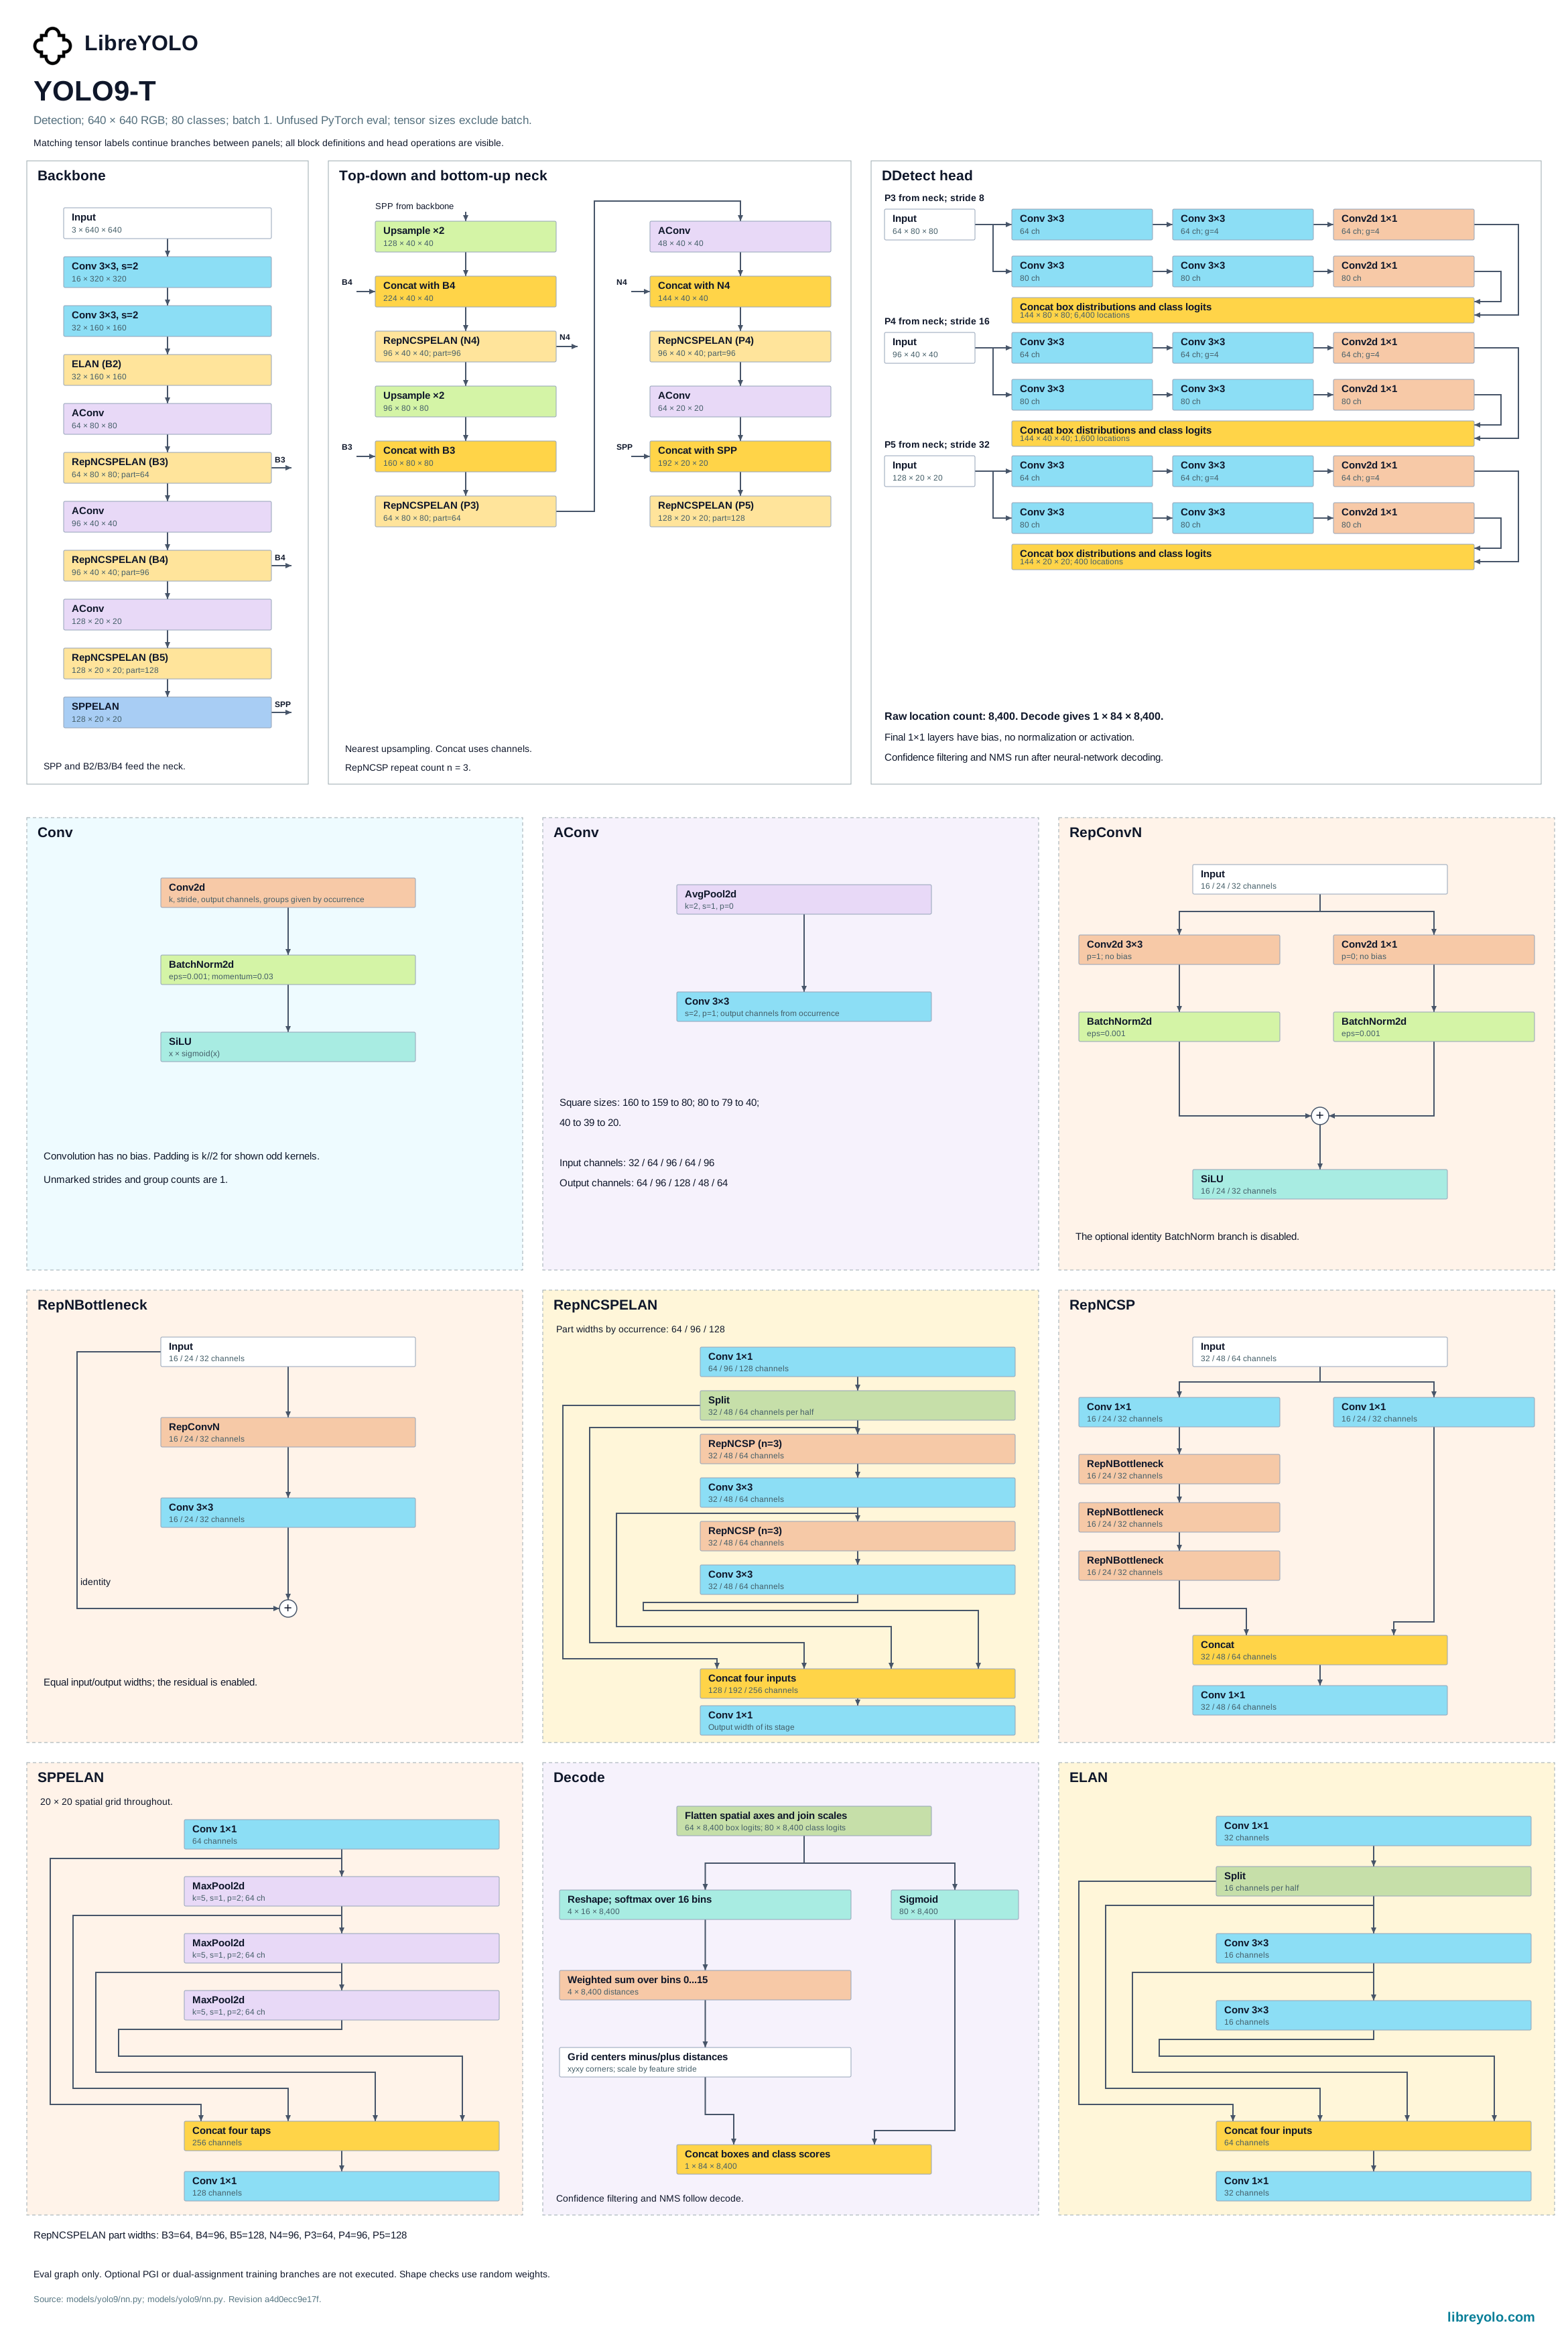
三个变体共用一个骨干。三者都只做检测,接受的参数也相同。
基础模型在三个特征尺度上预测,并用 NMS 清掉重复的检测框。
端到端模型保留那个 head,并在它旁边加了一条一对一匹配分支。推理时只读一对一分支, 取它得分最高的预测,所以不跑 NMS。当你部署的运行时没有 NMS 算子时,选它。
stride-4 模型从骨干上再往上取一层,把 neck 向下延伸到那一层,在四个尺度而不是三个 尺度上预测。多出来的这个尺度是给只占几个像素的目标用的;它已发布的那一个检查点 (checkpoint)是在航拍图像上训练的。基础检测检查点可以迁移进来:骨干和 neck 原样 加载,三组预训练的 head 整体上移一格,stride-4 的那组从随机初始化开始。
| 检查点 | 输入(px) | mAP 50-95 | 参数量(M) |
|---|---|---|---|
| LibreYOLO9c | 640 | 56.4 | 25.5 |
| LibreYOLO9m | 640 | 55.3 | 20.12 |
| LibreYOLO9s | 640 | 55.9 | 7.2 |
| LibreYOLO9t | 640 | 41.8 | 2.04 |
COCO val2017, 500 images。数据由 LibreYOLO 基准测试工具测得,并发布在 Vision Analysis 上,可在此比较不同硬件和运行时的延迟,并查看完整的运行记录。
训练
from libreyolo import LibreYOLO model = LibreYOLO("LibreYOLO9s.pt")model.train(data="my-dataset.yaml", epochs=100, imgsz=640, batch=16)libreyolo train model=LibreYOLO9s.pt data=my-dataset.yaml \ epochs=100 imgsz=640 batch=16from libreyolo import LibreYOLO9P2 # stride-4 变体没有自己的 COCO 检查点,所以指定一个基础检测的# 检查点:它的骨干和 neck 原样加载,stride-4 的那组 head 从随机# 初始化开始model = LibreYOLO9P2(None, size="s")model.train(data="my-dataset.yaml", epochs=100, pretrained="LibreYOLO9s.pt")pretrained 决定这次训练从什么开始。传 True 会加载同一模型、同一尺寸已发布的检查
点,传名称或路径则可以加载别的。形状对不上的张量会被跳过而不是报错,训练还会记录
加载了多少个,所以在不同类别数上训练出来的检查点仍然是一个可用的起点。
stride-4 模型没有自己已发布的 COCO 检查点,所以 True 在这里会解析到一个不存在的
文件,下载会失败。改为指定一个基础检测检查点。
数据集、数据增强、多卡训练和日志记录器见训练。
基础模型可以在主 head 旁边训练一个 PGI 辅助分支。这个分支只用于训练:预测和导出使用主 head。起始权重带有 PGI 张量,或者从头训练时,运行就会挂上它。已发布的基础检查点都不带,所以从它们微调只训练主 head,并会记录一条日志说明这一点。aux_weight=0.25 无论如何都会按这个损失权重挂上一个新分支,aux_weight=0 则保持关闭。断点续训的运行沿用它检查点里的 PGI 设置。在 m 和 c 尺寸上,这个分支就是上游的那个:输入图像上的第二个骨干,它的各个阶段由 CBFuse 与主骨干的 CBLinear 抽头相加,再加上它自己的 head,在 80 个类别下有 12.8M 和 25.7M 仅用于训练的参数。端到端模型和步幅为 4 的模型没有 PGI 分支。
三个变体在每个优化器步之前都把梯度 L2 范数裁剪到 10;clip_max_norm=0 关闭裁剪。标签分配用 fp32 给锚点打分,在 float16 autocast 下也是如此。max_labels=300 限制每张训练图像保留的检测框数,超过的检测框会被丢掉,只发出一次警告;分配所用的内存取决于每张图像真实的检测框,而不是这个上限。SGD 动量在三轮内从 0.8 预热到 0.937。letterbox_pad=None 继承检查点记录:未标记的权重使用 topleft,新的官方转换权重记录为 center。
YOLO9 和 YOLOX 的 mosaic 最多抽取 20 次,优先选择有标注的搭配图像;YOLO9 MixUp 使用相同策略。MixUp 默认关闭(mixup_prob=0)。开启时,混合比例从 Beta(1, 1) 中抽取,即在 [0, 1] 上均匀分布,与 MultimediaTechLab/YOLO 一致。非 RGB 输入配置见事件直方图。
验证
val() 返回一个由 metrics/ 键组成的字典,涵盖查准率、查全率、mAP 50 和
mAP 50-95,在任何采用你训练时所用格式的数据集上测量。
from libreyolo import LibreYOLO model = LibreYOLO("LibreYOLO9s.pt")metrics = model.val(data="my-dataset.yaml") print(metrics["metrics/mAP50-95"])print(metrics["metrics/mAP50"])libreyolo val model=LibreYOLO9s.pt data=my-dataset.yaml# 内置的 COCO yaml 带有一段内嵌的下载脚本,所以除非数据集已经# 在本地,否则需要显式放行libreyolo val model=LibreYOLO9c.pt data=coco.yaml imgsz=640 \ allow_download_scripts=True导出
| 任务 | ONNX | TorchScript | ExecuTorch | TensorRT | OpenVINO | Paddle | MNN | RKNN | ncnn | TFLite | CoreML | Core AI |
|---|---|---|---|---|---|---|---|---|---|---|---|---|
| Detection | Detection to ONNX:支持 | Detection to TorchScript:支持 | Detection to ExecuTorch:支持 | Detection to TensorRT:支持 | Detection to OpenVINO:支持 | Detection to Paddle:支持 | Detection to MNN:支持 | Detection to RKNN:不支持 | Detection to ncnn:支持 | Detection to TFLite:不支持 | Detection to CoreML:不支持 | Detection to Core AI:支持 |
一个勾对三个变体都成立:三者有差异的地方,矩阵取其中最弱的那个。
导出的产物按文件后缀经由 LibreYOLO() 重新加载,所以一个 .onnx 或 .engine 文件
的表现和检查点一样,返回同样的 Results。在不装 LibreYOLO 的裸运行时里跑这张计算图
也是支持的,但那样预处理和后处理就得你自己写。
对基础检测模型来说,其中后处理的那一半可以搬进计算图。ONNX 导出加上 nms=True 会把
抑制放进模型里,第一个输出变成一个固定的 (1, max_det, 6) 张量,每一行是
x1, y1, x2, y2, score, class,检测数之后补零。这张计算图是 batch 1 的,也不带动态
轴。端到端模型和 stride-4 模型不接受这个参数。
每种格式安装的 extra 不同,也各自带几个自己的参数。两者都在那个格式的页面上。
from libreyolo import LibreYOLO model = LibreYOLO("LibreYOLO9s.pt")model.export(format="onnx", imgsz=640)libreyolo export model=LibreYOLO9s.pt format=onnx imgsz=640libreyolo export model=LibreYOLO9s.pt format=onnx nms=True \ conf=0.25 iou=0.45 max_det=300from libreyolo import LibreYOLO, SAMPLE_IMAGE # 工厂按文件后缀分发,所以导出的产物加载方式和任何检查点一样,# 返回的也是同一个 Results 对象model = LibreYOLO("LibreYOLO9s.onnx")result = model(SAMPLE_IMAGE) print(result.boxes.xyxy)TFLite INT8 使用 int8=True 并提供校准数据。
ONNX 输入与输出
LibreYOLO9
| 张量 | images float32 [batch, 3, height, width] |
|---|---|
| 颜色 | RGB |
| 缩放 | 像素 / 255 |
| 归一化 | 无 |
| 缩放方式 | letterbox, bilinear, 填充值 114, 填充位置取自元数据键 letterbox_pad |
Scale by r = min(height / h, width / w), resize to (int(w * r), int(h * r)) and paste onto a canvas filled with 114.
Paste position comes from the letterbox_pad metadata key: topleft puts the image in the top-left corner, center splits the padding on both sides. A missing key means topleft.
Detection,默认导出
| 输出 | 形状 | 含义 |
|---|---|---|
output | [batch, 4 + nc, anchors] | Rows 0 to 3 are x1, y1, x2, y2 in input-canvas pixels. Rows 4 onward are per-class scores, sigmoid already applied. anchors is the cell count over strides 8, 16 and 32, 8400 at 640 x 640. |
后处理
- Transpose to [anchors, 4 + nc].
- Keep every (anchor, class) pair whose score is above the confidence threshold (0.25 by default). One anchor can yield several classes.
- Run NMS per class with IoU 0.45 and keep at most 300 detections.
- Map boxes back to the original image: subtract the pad offset, divide by r, clip to the image.
- Drop boxes whose width or height is 0 after clipping.
Detection,nms=True
| 输出 | 形状 | 含义 |
|---|---|---|
output | [1, max_det, 6] | Rows are x1, y1, x2, y2, score, class in input-canvas pixels, zero-padded past the detection count. Confidence, IoU and max_det are baked in and recorded as nms_conf, nms_iou and max_det metadata. |
raw | [1, 4 + nc, anchors] | The same tensor as the default export's output, before suppression. |
后处理
- Drop rows whose score is 0 or below your threshold.
- Map boxes back to the original image: subtract the pad offset, divide by r, clip to the image.
LibreYOLO9E2E
| 张量 | images float32 [batch, 3, height, width] |
|---|---|
| 颜色 | RGB |
| 缩放 | 像素 / 255 |
| 归一化 | 无 |
| 缩放方式 | letterbox, bilinear, 填充值 114, 填充位置取自元数据键 letterbox_pad |
Scale by r = min(height / h, width / w), resize to (int(w * r), int(h * r)) and paste onto a canvas filled with 114.
Paste position comes from the letterbox_pad metadata key: topleft puts the image in the top-left corner, center splits the padding on both sides. A missing key means topleft.
This model has no nms=True export. The exporter raises NotImplementedError, so only the default export below exists.
Detection,默认导出
| 输出 | 形状 | 含义 |
|---|---|---|
output | [batch, 4 + nc, anchors] | Predictions of the one-to-one head only. Rows 0 to 3 are x1, y1, x2, y2 in input-canvas pixels. Rows 4 onward are per-class scores, sigmoid already applied. anchors is the cell count over strides 8, 16 and 32, 8400 at 640 x 640. |
后处理
- Transpose to [anchors, 4 + nc].
- Flatten the [anchors, nc] scores into one list of anchors x nc (anchor, class) pairs. Pair i belongs to anchor i / nc (integer division) and class i % nc.
- Keep the 300 highest-scoring pairs (max_det), highest first. One anchor can yield several classes.
- Of those, keep the pairs whose score is above the confidence threshold (0.25 by default).
- Do not run NMS. The one-to-one head is trained to fire once per object, and LibreYOLO ignores the iou setting for this model.
- Map boxes back to the original image: subtract the pad offset, divide by r, clip to the image.
- Drop boxes whose width or height is 0 after clipping.
LibreYOLO9P2
| 张量 | images float32 [batch, 3, height, width] |
|---|---|
| 颜色 | RGB |
| 缩放 | 像素 / 255 |
| 归一化 | 无 |
| 缩放方式 | letterbox, bilinear, 填充值 114, 填充位置取自元数据键 letterbox_pad |
Scale by r = min(height / h, width / w), resize to (int(w * r), int(h * r)) and paste onto a canvas filled with 114.
Paste position comes from the letterbox_pad metadata key: topleft puts the image in the top-left corner, center splits the padding on both sides. A missing key means topleft.
This model has no nms=True export. The exporter raises NotImplementedError, so only the default export below exists.
Detection,默认导出
| 输出 | 形状 | 含义 |
|---|---|---|
output | [batch, 4 + nc, anchors] | Rows 0 to 3 are x1, y1, x2, y2 in input-canvas pixels. Rows 4 onward are per-class scores, sigmoid already applied. anchors is the cell count over strides 4, 8, 16 and 32, 34000 at 640 x 640. nc is 10 for LibreYOLO9P2s-visdrone. |
后处理
- Transpose to [anchors, 4 + nc].
- Keep every (anchor, class) pair whose score is above the confidence threshold (0.25 by default). One anchor can yield several classes.
- Run NMS per class with IoU 0.45 and keep at most 300 detections.
- Map boxes back to the original image: subtract the pad offset, divide by r, clip to the image.
- Drop boxes whose width or height is 0 after clipping.
要检查你自己的实现,请用 LibreYOLO 运行同一个文件:LibreYOLO("model.onnx").predict("image.jpg") 会返回参考结果。 已用 LibreYOLO 1.7.0 验证。
检查点
这个家族已发布的全部权重文件。
| 文件 | 输入(px) | 权重许可 |
|---|---|---|
| Detection | ||
| LibreYOLO9t.pt | 640 | mit |
| LibreYOLO9s.pt | 640 | mit |
| LibreYOLO9m.pt | 640 | mit |
| LibreYOLO9c.pt | 640 | mit |
| LibreYOLO9E2Et.pt | 640 | mit |
| LibreYOLO9E2Es.pt | 640 | mit |
| LibreYOLO9E2Em.pt | 640 | mit |
| LibreYOLO9E2Ec.pt | 640 | mit |
| LibreYOLO9P2s-visdrone.pt | cc-by-nc-sa-3.0 | |
上面的每个文件目前都在 LibreYOLO 组织中,并会在首次使用时下载。
许可证
请检查你所下载的具体权重在 Hugging Face 仓库中的许可。LibreYOLO 组织里的每个检查点都附有许可,同一家族内也不一定相同。该仓库是权威来源;以下摘要说明本页上次验证时适用的情况。
这里只说明涉及的许可证,不构成法律意见。如果答案对商用很重要,请自行阅读许可证并咨询法律顾问。
- 原始工作
- YOLOv9, MultimediaTechLab
- 上游许可
- MIT
- LibreYOLO 代码
- MIT
- 权重
- 采用 MIT 许可,重新发布在 huggingface.co/LibreYOLO
- 解读
- MIT is a permissive license, so these weights can be used in commercial and closed-source products. The one standing obligation is to keep the license text and the copyright notice, Kin-Yiu Wong and Hao-Tang Tsui, with any copy you redistribute. It places no condition on your own application code, and a model you train yourself on your own data is yours. Two things are worth knowing beyond that. The code is ported from the authors' MIT re-release of YOLOv9, MultimediaTechLab/YOLO at commit c4cb5f6f, not the GPL-3.0 repository that carries the same model, so the permissive terms come from the source LibreYOLO actually derives from. And one checkpoint in this family is not MIT: the weight repository of the stride-4 VisDrone model, LibreYOLO9P2s-visdrone.pt, declares CC BY-NC-SA 3.0, which rules out commercial use and requires share-alike on derivatives.
这三个变体的代码都移植自 MultimediaTechLab/YOLO 的提交 c4cb5f6f(MIT)。端到端模型的一对一预测器沿用 Yiqun Chen 的 DATE(Apache-2.0)的设计,为 LibreYOLO 重新实现,没有复制任何 DATE 代码。步幅为 4 的层级是 LibreYOLO 自己的代码。
步幅为 4 的航拍检查点预测 VisDrone 类别。请遵循权重仓库记录的发布者许可声明。
引用
@inproceedings{wang2024yolov9,
      title={{YOLOv9}: Learning What You Want to Learn Using Programmable Gradient Information},
      author={Wang, Chien-Yao and Yeh, I-Hau and Liao, Hong-Yuan Mark},
      year={2024},
      booktitle={Proceedings of the European Conference on Computer Vision (ECCV)},
}
复制自作者在 github.com/MultimediaTechLab/YOLO#citations 上提供的引用块。